

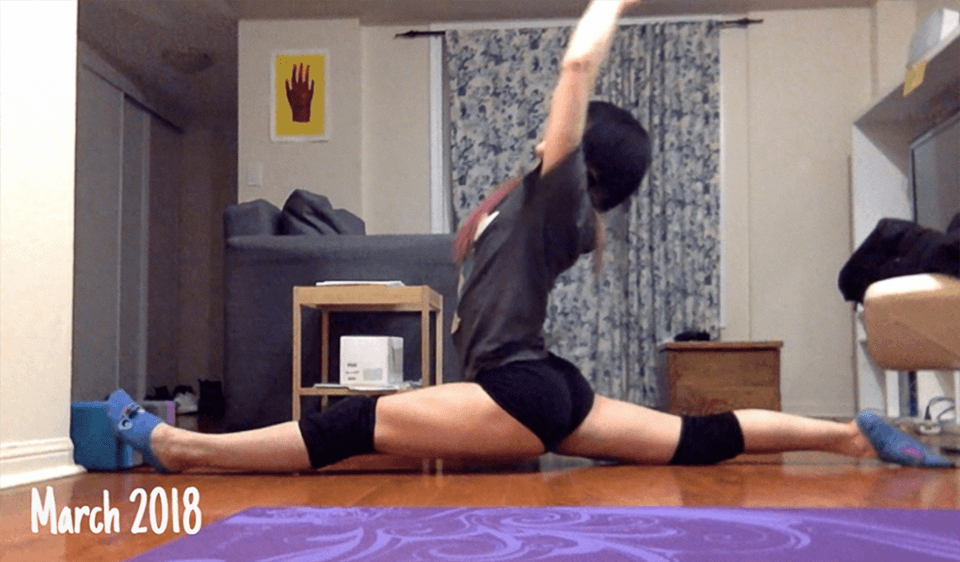
At the 5 month mark, my left splits was 3 inches away from the ground and my right splits was 4 inches. I was at the last few inches of my front splits, but I couldn’t quite get down all the way. I did some research, made a few changes to my routine and got my splits in 2 days later.
Many people encounter a plateau before achieving their splits. Overcoming this plateau, requires you to change up your routine. This could mean stretching in different angles, changing the duration, adding strength exercises or applying different stretching techniques to maximize your range of motion. Here are 8 tips that helped me get a lot lower into my splits during the last few weeks and one tip that got me my splits in 2 days.
Overview
- Stretch with Different Angles
- Hold Stretches Longer
- Use Different Stretching Techniques
- Partner Stretches
- Strengthening Exercises
- Always Warm Up Properly
- Doing The Splits With “No Hands”
- Practice Over Splits
8 Tips to Get the Last Few Inches of Your Front Splits
When you’re only a few inches away from getting the splits, it’s tempting to push yourself down just a little further. I’ve been there – I even had dreams that I got my splits right before I got it. What worked for me may not work for everyone. These tips were very effective for getting the last few inches of my front splits.
Note: Attempt these exercises only if you are around 5 inches from the ground. You should be able to hold your own body weight without using yoga blocks and sit comfortably in the splits position. If you are more than 5 inches from the ground, you may apply some of these techniques to see what works for you. Always listen to your body and keep up with your stretching routine to see progress.
1) Stretch with Different Angles
How it works: Opens up the hips and Increases its range of motion. This will make it easier to square out your hips.
Move forward and backwards, shift your weight, add upper body twists or do hip rotations while holding static stretches. If you are close to the ground, you can begin to incorporate more advanced stretches and transitions. Below are a few stretches you can try out.
Shifting your Weight in a Side Splits Position
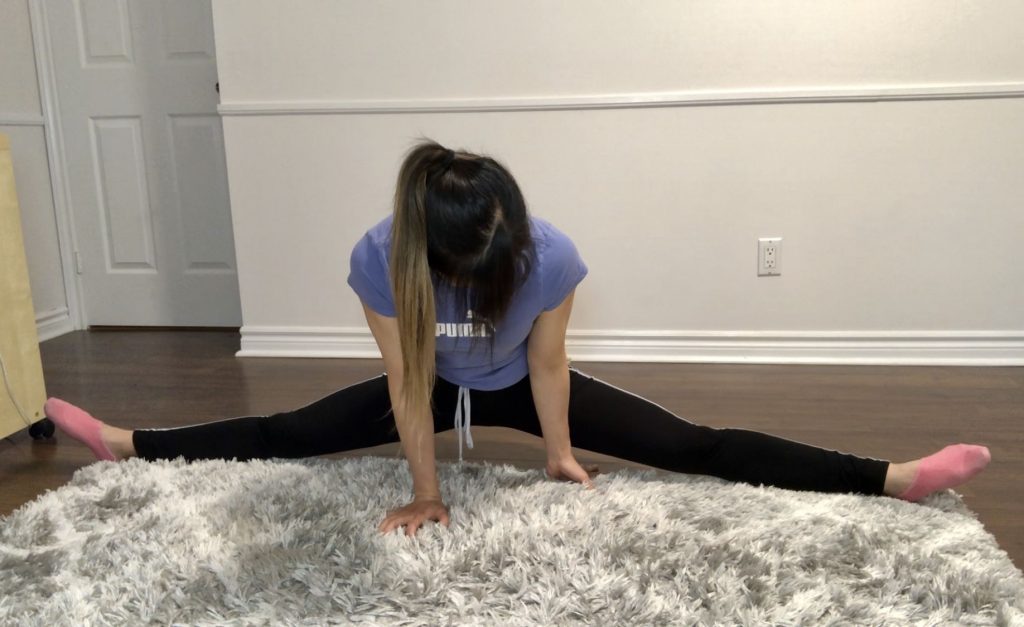
- In the side splits position, tilt your hips to the front and to the back.
- You can also twist your upper body and look behind on either side.
- Gently move from one position to the other.
Front Split to Side Split Hip Rotation
- Start in a front split position with your right leg in front. Your upper body should be facing the right side. Hold this position for 10 seconds.
- Slowly transition into a side split by walking your hands to the front of your body. Hold for 10 seconds.
- Walk your hands to the left side and hold a front split position with your left leg in front for 10 seconds.
- Repeat this hip rotation for 4 sets.
King Author Stretch with Back Bend
- Place a cushion next to the wall. This will help protect your knees.
- Kneel down and place one knee onto the cushion. You body should be parallel to the wall.
- With the knee that’s closest to the wall, rotate your leg up up against the wall. Try to bring your shin bone as close to the wall as possible.
- Step forward with your opposite foot to get into a low lunge.
- Slide your front foot straight against the ground into a half split.
- Begin the back bend by looking up and back at the wall. Begin walking your hands down the wall as you breathe. You should feel the stretch in your hip flexor and back.
- Hold for 20-30 seconds. Repeat on the other side.
- Modification: You may hold a deep lunge instead of straightening out your leg or skip the back bend.
2) Hold Stretches Longer
How it works: According to research at the Massachusetts Institute of Technology (1), “one of the reasons for holding a stretch for a prolonged period of time is that as you hold the muscle in a stretched position, the muscle spindle becomes accustomed to the new length and reduces its signalling.” Gradually, you can train these stretch receptors to allow your muscles to lengthen.
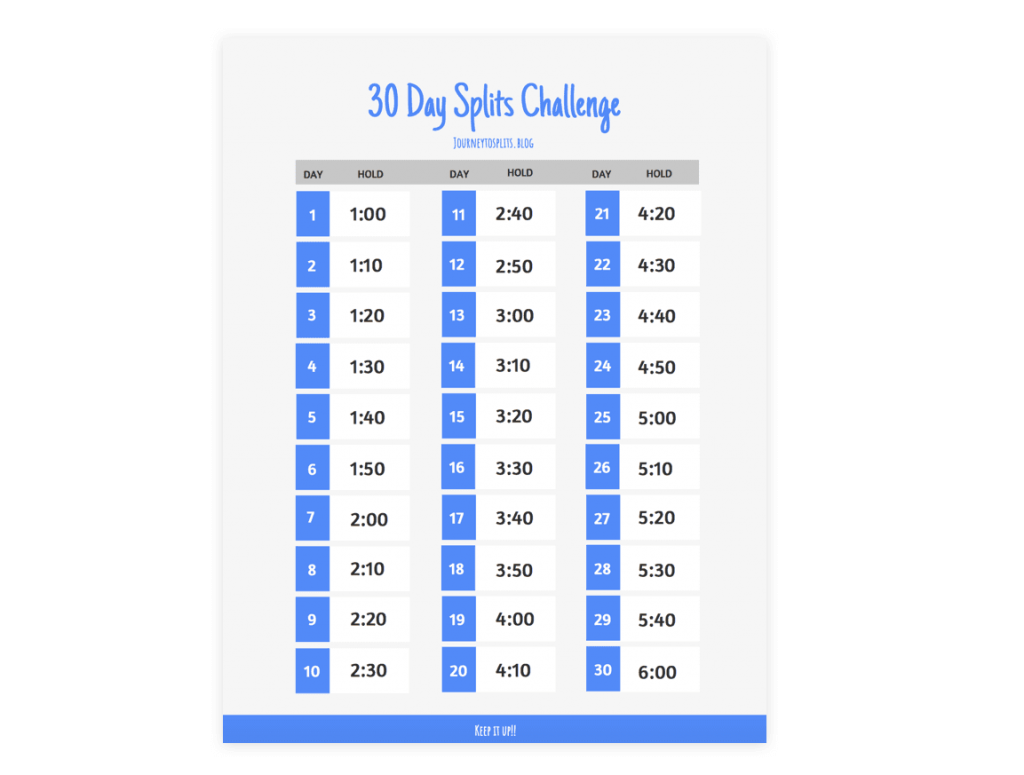
Instead of holding your stretches for 20-30 seconds, you can try holding your splits for 30-45 seconds. As part of the 30-Day Splits Challenge, I increased my stretching intervals by 10 seconds every night which made it easier to hold stretches over time. Try this out with caution. The general guideline for how long you should hold stretches is 30 seconds (2). If you have any injuries, please seek professional advice for how long you should stretch for.
3) Use Different Stretching Techniques
How it works: There are many stretching techniques used by fitness professionals such as dynamic, isometric or proprioceptive neuromuscular facilitation (PNF) that can make your stretches more effective. These techniques activate and strengthen the muscles you use while doing the splits.
Dynamic stretches are stretches with controlled movement. Normally these are done as a warm up exercise but you can also incorporate dynamic movements between stretches. For example, doing leg kicks or figure-8s with your hips can help to open the hips for a pigeon stretch. You can also engage your muscles as you moving back and forth from one stretch to another.
Isometric contractions are contractions of a muscle or group of muscles when you hold a particular position. For example, while you are in the splits you can practice squeezing your thighs together. Edward R. Laskowski, M.D. from the Mayo Clinic (3), explains that isometric exercises only helps to build strength in one particular position but practicing these contractions will help improve stabilization.
PNF stretching is one of the most effective techniques for increasing your range of motion. I’ve written a complete post how to do PNF for front splits, where I go into detail about how PNF works and which exercises you should do to get your splits fast.
4) Partner Stretches
How it works: Doing stretches with a partner can help you achieve greater flexibility by applying pressure to deepen your stretches. You can also do PNF stretches with the help of a stretching partner
Partner Hamstring Stretch
If you do not have a stretching partner, this stretch can be done alone using a yoga strap. This stretch is very effective for getting results quickly. When I took flexibility classes, the instructor would have us partner up at the end to do this PNF stretch. Some students who started 5 inches off the ground could get their splits by the end of class.
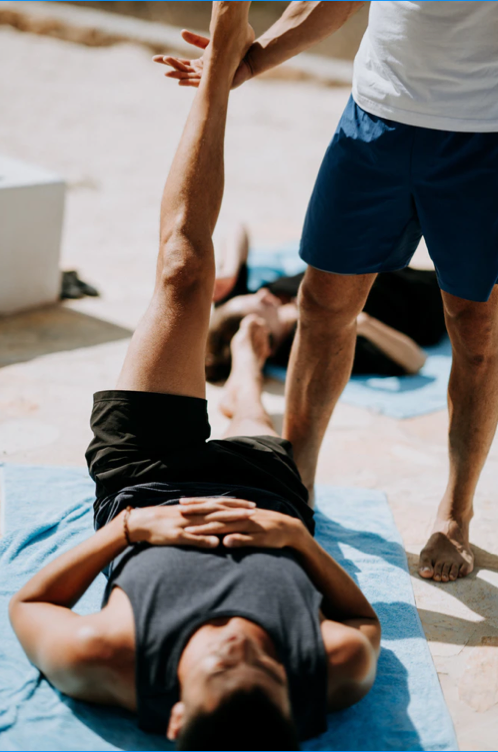
Partner 1 is the person being stretched and Partner 2 will assist with the stretch.
Step 1: Setting Up
- Begin by having Partner 1 lay with their back on the mat.
- Partner 2 should gentle tug Partner 1’s right leg making sure that the leg is completely relaxed. Gently shake the leg side-to-side, up and down to release the femur (thigh bone) from the hip socket. This will give space and increase the degree of rotation within the socket when stretched.
- Partner 2 will lift Partner 1’s right leg to the maximum level of flexibility. There should be a bit of discomfort but not enough for there to be pain.
- After finding this position, Partner 2 should place their partner’s leg on their left shoulder in a kneeling position. One hand on the partner’s calf and the other hand on the partner’s quad. The leg should be directly aligned to the partner’s shoulder and ear. Do not do this stretch if the leg too far outwards or inwards. You will injure your partner.
Step 2: PNF Stretching
- Partner 1 – Isometric Contraction: Partner 2 should hold the leg firmly and tell Partner 1 to begin kicking their leg into Partner 2’s shoulder. Count out loud and hold this position for 10 seconds.
- Parter 2 – PNF: Partner 2 will tell Partner 1 to relax. Partner 1 should Inhale and on the exhale Partner 2 should gently move the raised leg towards their partner’s shoulder or ear. Again, the leg must be directly aligned. Find the partner’s new maximum level. Partner 1 should keep an even breath and hold the stretch for 30 seconds. Partner 1 must be completely relaxed in this position to achieve full effects.
- Do 3 reps on one leg, then switch legs.
5) Strengthening Exercises
How it works: Flexibility should be a combination improved range of motion and improved strength. David Sheer (4), an orthopaedic manual therapist in Nashville, Tennessee, says that flexibility with strength becomes “useful flexibility”. Sheer says “if you only increase your passive flexibility without developing the strength to control it, you make yourself more vulnerable to a serious joint injury.”
Add compound movements such as a deep squat or Romanian deadlifts to strengthen muscles in your groin and hip flexors. Flexibility is enhanced by strength exercises. Developing strength in the front of the thigh helps to relax your hamstrings (the opposite muscle group), which will noticeably increase your range of motion.

6) Always Warm Up Properly
How it works: Warming up increases blood flow to your muscles. This helps your joints move better, reducing stiffness and risk of injury. Warm muscles have greater elasticity and allows you to access your body’s full range of motion.
If you spend less than 5 minutes warming up, try increasing your warm up time 10-15 minutes. I notice the biggest difference in flexibility at the end of a training session when my muscles are the most elastic. I’ve written a post on my favourite warm ups to do before stretching and links to routines that you can follow-along on YouTube.
7) Doing The Splits With “No Hands”
How it works: Holding the splits with “no hands” will allow your muscles to fully support the weight of your body. The added weight will quickly bring you closer to the ground.
I practiced this exercise for 2 days and I got my splits. When I let go of the blocks my legs were able to slide apart and I quickly got the last few inches of my front splits. I recommend wearing socks to help you side. Only try this technique if you have done strengthening workouts before.
8) Practice Over Splits
How it works: An over split is any split where the angle formed by the legs is greater than 180 degrees. This can be done by elevating one leg or both of the legs. Practicing the over splits will stretch your legs past 180 degrees so that it would be easier to get into the full splits.
Place a pillow under your front foot when doing the splits. However, there are risks to doing the over splits that you should be aware of first before giving it a try. Personally, I do not practice the over splits in my routine.
Takeaway
If you are a few inches away from the ground, you’ll get there soon! The tips I mentioned in this post were all the things I tried to get the last few inches of my front splits. Tip number 7, doing the splits with “no hands” worked the best for me and I was able to get my splits in 2 days.
If you’ve given any of these tips a try, please share your experiences. I’d love to hear what you’ve tried!

Thank you for this! I am exactly 5 inches off the ground in my right front leg split, and I’ve been around this for almost a month now, what should I do? I do all of the stretches above and more.
Thank you for the comment Shelby! You’re sooo close! PNF stretching, ‘no hands’ split (using gravity) and loaded mobility training helped me build the strength and stability to get the last few inches of my splits. Remember how far you’ve come.. keep at it!